DIY Spell Book from Hocus Pocus
- Drew S

- Aug 27, 2020
- 6 min read
Updated: Apr 4, 2022
Hi friends! You asked, so here it is! Eeeeek, I'm so excited to show you how to make this!

I have been doing a TON of DIYing this year (thanks pandemic). Normally I make about one thing a month, furniture, crafts, jewelry, you name it. I've been a roll lately, so definitely check back as I start posting more tutorials.
This has been a favorite. Hocus Pocus was always a favorite movie of mine growing up and still is! This book is an actual functioning recipe book, but I will forewarn you, it takes some doing to create the entire thing. But don't worry, I'll walk you through it all! So go dig through your Pinterest boards, saved Facebook posts, index recipe boxes and find your most favorite fall and Halloween recipes.
Materials
1 book or binder (I used this one from Michael's Hardbound Sketchbook by Artist's Loft™, 8.5" x 11")
String, yarn, thin rope or the like (I used standard white yarn)
Paper towels
1-2 inch wide paint brush (for painting on mod podge)
Small paint brush (for painting the book)
Tiny paint brush with a fine tip (for painting the eyeball)
Craft paint - brown, black, blue, white, green, silver
Brown puffy paint (for the stitches)
Craft Smart polymer clay (you can also use the air dry clay, but it will add more time to your project)
Exacto knife
Clay roller
Glue (any craft glue works)
Pen or a large nail (to create the detail in the pre-baked clay)
Hinges (try finding them in silver)
Magnets (NOTE- I used one strong and one weak, like magnetic tape or adhesive magnets, that way when you use your book, it doesn't rip and paint off. Magnetic tape is also easy to cut)
LET'S GET STARTED
Lay your book down on a protected surface, it's Mod Podge time! Fully coat the top of the book with your larger brush.

Place your string in the same pattern as the stitches on the book (save a picture and keep it handy).

Lay down torn up paper towel pieces, in any pattern. Just make sure to cover the whole book.

Mod Podge over the paper towels. You'll need a good amount.

To create some texture, use your fingers and pinch, tear small pieces, smoosh it around.


Coat the spine of the book in Mod Podge, lay down paper towel and paint more Mod Podge over the top. Let dry over night or SEVERAL hours.
While the book is drying, let's make some clay! Roll out a ball the size of a quarter.

With your exacto knife or a very sharp kitchen knife, cut the ball in half. Gently mold with your fingers if needed. Set aside for baking (or air dry overnight).


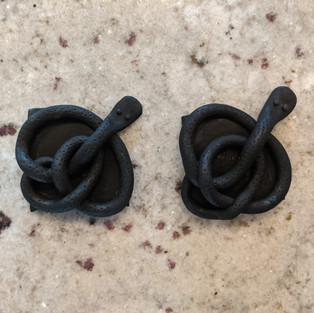
Next item - the snake ropes/plates.
Roll out some clay. Cut out a quarter circle (each straight edge around 2-2.5 in.) Cut two, set aside.


To make the snakes, roll out clay. Make it long, about 12 inches so you have plenty to work with. Taper it at one end.

Once you have it rolled out, set one of the quarter circle plates in front of you and start assembling the snake right on top. Follow the pictures closely, this thing is confusing. Flatten and shape the snake head. Add teenie balls for eyes.
Ignore the blue color, I ran out of white clay!


Add some detail with a nail.


Make two of these. Side aside to bake (or air dry).
Let's make the next piece!
To make the long spine plate, hand roll out clay (make sure it's over 10 inches). Then, roll it out with the clay roller.


Straighten the edges with a ruler or side of a book. Trim the ends with an exacto knife. It should measure 10 inches when done. Set aside.


Make the snake. Roll out clay to about 9.5 inches. Flatten and shape the snake's head. When it is rolled out, lay it out on the plate in a wave pattern. Add some teenie eyeballs. Add detail with you nail. Set aside to be baked (or air dried).


Time to make the round eyeball frame (not really sure what else to call it). Roll out some clay, large enough to create about .5 - .75 inch space around the eyeball. Then roll out a smaller rectangle about an inch long by .5 inch wide.


Next, take your clay roller and roll it all out gently. You want the ring to be flattened just a bit.

Add texture with a pen. Make 3 dots and leave a touch more space, then add 3 more dots. In between each set of 3 dots, use a credit card to make a line. Use the other end of the exacto knife to create a circle in the tab piece.


Okay, time to make the claw for the back of the book and the last piece that will connect the hinges.
Roll out a piece of clay about 1.5 inches long and 1 inch wide. Make a messy zig-zag. I used the corner of a credit card. Set aside to bake (or air dry).


Time to make the claw. Make the 5 rounded rectangles you see below. Attach one finger at a time. Once the hand is formed, use a credit card to add lines, making sure to get in between the fingers. Last, form nails. Take a pea seized piece of clay and roll it between your fingers until there a point at one end. Smoosh it into the end of the finger. When all the nails are attached, bake or air dry.


Bake all of your pieces according to the clay instructions.
Once your book is dry, coat the back cover with Mod Podge.

Place paper towels and coat with Mod Podge. Use your brush or fingers to give it texture. Set book aside and let dry.


After the clay has cooled, paint all of the pieces black, except the eyeball (they might need two coats).


Let dry, then paint your black pieces silver. Be light-handed, and leave small areas black so details show through and it looks 'aged'.

Once the book has dried, glue the eyeball to the book. Before gluing down, take your ring and measure to make sure the eyeball is in the correct spot.


Next, glue your magnet down. Again, measure with the ring, as the magnet will sit right below the left part of the ring.

Next, paint the eyeball.
You can get as layered or creative as you'd like. I did several layers of color to give it a realistic look. Once each layer has dried, add a pupil at the end (forgot to take a photo of that part).


Wash off your brush and pour some black paint. To give it more depth, we'll start with painting the 'seams' on the book black.

Let dry. Next, we'll whip out the brown paint (I used medium brown).
Paint over everything but the eyeball. Use small strokes so it isn't streaky. Make sure to paint the spine as well. Paint two to three coats and blend over the black very well so you can't see any streaks.


Let dry and do the same thing to the back of the book.
Next, we have to create the 'eyelid' with Mod Podge and paper towels. Blot some Mod Podge all around the eye. Coat the bottom part of the eyeball as well. Lay down a small piece of paper towel (the straight edge), as the lower eyelid and cover about a quarter of an inch of the eyeball. Mod Podge over the top of it with a thick coat.


Next, lay down the top eyelid. Mod Podge the upper half the eye. Lay down another piece of paper towel over the top as the upper eyelid. Mod Podge over the top with a thick coat.

While that dries, we can glue down some of the silver accessories.
Using the craft glue, glue down the long snake along the spine, about a quarter of an inch away from the spine. Glue the curled up snakes on each corner of the front of the book, leaving some room between the piece and the edge of the book. Let dry.


Grab your hinges and the last of your clay pieces. We're going to connect the claw, the middle rectangle piece and the the front ring. After all pieces have been glued together, set aside to dry overnight.


Let's go back and paint around the eye. Paint the area black that was originally painted black. Let dry.

Once dry, paint two to three coats of brown. Let dry.

Cut a small piece of the magnetic tape and glue it to the back of the ring on the far left side.

Next, glue the claw to the back of the book. Let dry overnight.

You can do this before OR after gluing on the hinges. Totally up to you as far as measuring goes.
Make sure to add a pea-sized dot of yellow on the ring for the jewel.

The last step is making the stitches over the seams with puffy paint.

Let the final product dry for 24-48 hours before handling.
Yay, you're done!

Tips
You can add fingers to the spine if you want to really go all out. I shaped small half inch sized fingers with carved nails, painted them brown and glued them to the side.

Recipe Pages
I gathered my favorite fall and Halloween recipes and printed them on 8x11 paper. I coated the pages in the book with Mod Podge and laid the printed pages down and closed the book to smash it all down. With thick coats of Mod Podge, it creates a thick, wavy, old book look.
Notes
Anything linked and posted above are from materials I have used and like. There are no affiliates and no one receives money for anything I post.
Thanks for reading and I'll see you for my next project!
-Drew


Comments